Plumbing

What Does a Plumber Do?

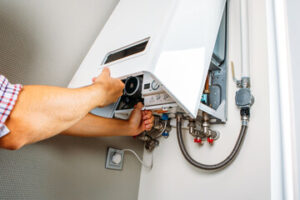
Plumbing systems take away wastewater, supply hot and cold water, and regulate indoor climate through pipes, fixtures, valves and appliances. Plumbers install, repair and maintain these systems.

Plumber

Plumber St. Petersburg FL understands how different types of systems work and be familiar with building regulations and codes. They need to have the physical strength and stamina for manual labor, and be comfortable working in tight spaces.

A plumber needs a variety of tools and equipment to install, repair, and maintain plumbing systems. These tools include pipes, fittings, fixtures, valves, and other hardware. Plumbers also use specialized tools to identify and troubleshoot issues with water pressure, temperature, and other components of a plumbing system.

Plumbers often use press fitting systems to connect piping quickly and securely. These systems create a strong, lasting seal that prevents leaks. A plumber may also use a hand auger or drain snake to dislodge and clear blocked pipes. These tools are often used in conjunction with a video camera to help locate the source of a clog or other problem.

Other tools a plumber uses include a pipe cutter, power drain snakes, and wrenches. A pipe cutter can cut through hard surfaces and tight spaces. Plumbers also use wrenches to turn and remove bolts, nuts, and screws. These tools have a wide range of adjustment and feature specialized, angled jaws for all types of tasks.

Plumbers can also use a crimp tool to join multiple pieces of metal or other material together. This is especially useful for joining PEX piping, which is becoming increasingly popular in residential and commercial plumbing. A crimp tool works by deforming or squeezing one or both of the joined parts to hold them together. Plumbers may also use a hydraulic pipe bender to twist and curve pipe lines.

Finally, a plumber may need to use a gas detector to test for the presence of carbon monoxide and other dangerous gases. These devices are typically located near boilers, water heaters, and furnaces.

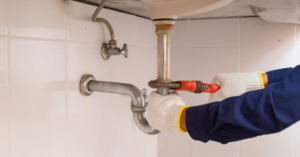
Plumbing is a hazardous job, and plumbers must wear safety gear to protect themselves from bacteria, viruses, germs, and chemicals. This includes a mask, goggles, and gloves. Additionally, plumbers should wear heat shields when soldering or working with hot materials.

Tools

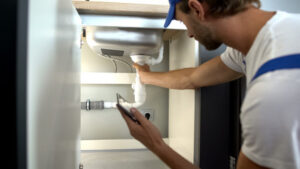
A plumber works with a wide range of tools to install, repair and maintain pipes, tubes and supply lines. Pipework tools include cutters, a hacksaw and a pipe wrench. A plumber also needs a variety of other hand tools and specialty hardware. A deburring tool is used to smooth modification marks on pipe edges, and a reaming tool enlarges holes or openings in pipes. A roll of emery cloth is also a must for all plumbers, as it is an abrasive material used to remove burrs on pipe threads.

Other tools a plumber might use include tongue and groove pliers (also known as Channellocks or multi-grips), which have jaws that lock into place and remain parallel to grip materials. This provides extra leverage and makes it easier to turn or hold nuts and bolts. These pliers can also grip or rotate irregular objects and clamp materials. A set of needle-nose pliers is another handy plumbing tool that features long, tapered jaws that can get into narrow spaces where other types of pliers are unable to reach.

Wrenches are an essential part of any plumber’s toolkit and the most common type is a pipe wrench. It’s designed with a long handle that allows the user to tighten or loosen pipe fittings and nuts in hard-to-reach places behind sinks and faucets. Plumbers also need a set of adjustable wrenches, which have jaws that adjust to different fastener sizes. A strap wrench is a different type of wrench that has a durable strap attached to the handle for evenly distributing force when turning fasteners in tight spots.

Plumbers often work with screws, and a basic screwdriver set is necessary for the job. A typical set includes open-end, box-end, socket tube, radiator and chain wrenches, as well as Allen, basin and strap wrenches. Plumbers might also need a stubby screwdriver set, which is smaller than standard screwdrivers and can fit tiny screws found on cabinet hinges.

A plumber must also have access to pipe thread sealant, which creates a leak-free seal on threaded pipes. This is especially important when re-installing old pipes or when repairing broken threads on new pipe installations. A plumber should also have a flow rate calculator and a way to convert units of measurement.

Safety

As plumbers work in people’s homes, they must be aware of and ready to face a variety of safety risks. Some of these include:

Exposure to bacteria and germs: Plumbers have the potential to come into contact with contaminated water, rodents and other debris that can cause diseases such as Campylobacter, E. coli and Giardia duodenalis. This can lead to diarrhoea, stomach pains or cramps, dehydration and even fevers. It’s therefore important that they wear face masks and gloves and keep their tools clean.

Tools: Plumbing technicians are responsible for using various complex and specialized tools that can be dangerous in the wrong hands or used incorrectly. This puts them at risk of injury from abrasions, cuts, punctures, burns and other injuries. It’s crucial that they understand the safety measures for each tool they use and adhere to them, especially when working around flammable or combustible materials such as gas lines and steam or hot water pipes.

Working at heights: Plumbing jobs often require a plumber to climb ladders or scaffolding in order to reach difficult spots. This can pose a risk of falling which can cause serious and fatal injury. It’s recommended that plumbers take every precaution when working at heights and always use a harness, secure themselves to the equipment they are using and ensure there is someone to help them in the event of an emergency.

Eye injuries: Due to their constant exposure to foreign matter, chemicals and bacteria, plumbers are at risk of sustaining eye injuries. This can include abrasions, cuts and scratches as well as infections from bacteria or germs that get into the eyes through openings in the skin. It’s therefore important that they wear protective glasses when needed, especially when working in confined spaces or near liquids or hazardous materials.

Slips and falls: Plumbers are also at risk of slipping or tripping when working in awkward or tight spaces. This can result in bruises, sprains, fractured bones and other injuries. To avoid this, plumbers should use appropriate footwear and be careful when walking on slippery surfaces or in wet areas. They should also be mindful of their surroundings at all times and avoid distractions to prevent accidents from happening.

Licensing

There are several different paths to becoming a plumber. Some enter through a formal apprenticeship or trade school program. Others acquire the skills through hands-on training with a journeyman plumber. Some states require that plumbers obtain a license to work independently. This usually requires passing a written exam that tests technical know-how and knowledge of local plumbing codes. Additional certifications may improve a plumber’s marketability and pay.

Plumbers work in a variety of settings, including residential and commercial buildings. They often install systems in new construction, and they must be able to adapt existing systems for renovation projects. This can involve modifying pipes and fixtures to accommodate new appliances or changes in the building’s use. Plumbers also must be able to read blueprints and understand building code requirements.

Some plumbers specialize in specific types of plumbing systems. For example, one may focus on water supply or drainage systems for manufacturing facilities. They may also work on fire sprinkler systems in office buildings or hospitals. Plumbers who work on large-scale industrial plumbing equipment often need to collaborate with engineering teams to design the systems and ensure that they are integrated into the overall facility.

Plumbing technicians must be able to communicate effectively with customers. They must be able to explain complex procedures in layman’s terms and answer questions thoroughly. They must also be able to estimate project costs and timeframes accurately.

Another essential skill is critical thinking. This allows a plumber to weigh alternatives and choose the best solution for each situation. It is important for plumbers to be able to solve problems quickly and efficiently, especially when working under pressure.

Finally, plumbers must have physical strength to handle tools and heavy equipment. They must be able to climb ladders and stairs, and they may need to lift heavy objects. Plumbers who work on sewage systems must be aware of the potential risks associated with working around human waste. They can be exposed to infectious diseases such as cholera, typhoid, hepatitis, polio, cryptosporidiosis and ascariasis. These infections are typically transmitted through contact with fecal matter or vomit that enters the sewer system.

Plumbing

Water Heater Repair – How to Keep Your Water Heater Running Smoothly

Water Heater Repair Spring TX is best left to a professional plumber. However, routine maintenance is important to help keep your system running smoothly.

Water Heater Repair

If you notice a sulfur smell or discoloration, turn off your water and try draining it. This may clear up the problem. If not, the anode rod may need to be replaced.

A faulty thermostat can cause a variety of problems. It may be unable to read the correct temperature, or it may not even work at all. A malfunctioning thermostat can also lead to a tripped circuit breaker or excessive heat, both of which can be dangerous. If you’re experiencing any of these issues, you should consult a professional to fix them.

Thermostats are the brains of your water heater, controlling the temperature and determining how hot or cold the water will be when you turn on your faucets. When the thermostat isn’t working properly, it can affect the overall function of your system. Luckily, there are a few things you can try to troubleshoot your thermostat and determine the problem.

If the screen on your thermostat isn’t lighting up, it means that there is no power getting to the unit. This could be caused by a tripped breaker or an old battery that needs replacing. To resolve this issue, locate your electrical panel and find the breaker that’s dedicated to your HVAC system. If it is flipped to the “off” position, switch it back to “on.” You should also check the thermostat to ensure that the heat setting isn’t set too high.

You can check the upper and lower thermostats to make sure that they’re functioning properly by turning off the power at the service panel and removing the access panels for both. If you’re unsure how to do this, consult a plumber for advice.

Next, disconnect the power wires from both of the thermostats to isolate them and give you an accurate reading. Once the connections are disconnected, you can test each of them with a multimeter. To do this, touch one of the meter’s leads to the terminal and the other to the metal piece that connects it to the heater. Your meter’s display should show close to zero ohms of resistance if the connections are secure.

If the resistance is higher, the thermostat is defective and will need to be replaced. If you’re not comfortable working around electrical components, it’s a good idea to consult with a plumber to have them perform this task safely and correctly.

The Pilot Light Isn’t Working

In a gas water heater, the pilot light is what ignites the burner that heats the water. If the pilot light isn’t working, the gas won’t ignite and you won’t have hot water. A functioning pilot light should burn blue. If it is orange or yellow, it isn’t burning properly and won’t trigger the thermocouple to open the gas valve. Fortunately, this is an easy fix and can be done by cleaning or replacing the pilot light.

There are a few reasons why the pilot light might not be working. The first is that the thermocouple may be dirty. If this is the case, shut off the gas to your water heater, let it cool down, and then gently clean the thermocouple. If it still doesn’t light, there could be a problem with the wiring or the thermocouple may need to be replaced.

Another reason your pilot light might not be working is that the pilot tube is clogged with debris. You’ll need to remove any dirt or grime from the pilot tube and then very carefully bend it back so that the flame can touch the thermocouple.

Lastly, the gas control valve might be stuck. If this is the case, you’ll need to turn off the gas, wait a few minutes, and then turn it on again. Then you’ll need to find the reset button (often a knob) and press it while lighting the pilot light. After the pilot light lights, hold down the button and continue to do so until you see a blue flame in the gas window.

It can be frustrating when your pilot light keeps going out, especially if you have a lot of tasks that require hot water. But with some troubleshooting, you can usually figure out what the problem is and how to fix it. It’s just a matter of finding out what the issue is and whether or not you have the tools to complete the job.

The Dip Tube Is Worn Out

The purpose of a water heater’s dip tube is to keep cold water from mixing with hot water as it travels down from the tank to your faucets and appliances. This process allows hot water to flow at a higher temperature and helps your home’s plumbing fixtures stay clog-free. But constant exposure to hot water and minerals eventually erodes plastic dip tubes. If you’re experiencing lukewarm showers or notice white, plastic flecks in your sinks and bathtubs, it’s time to replace the dip tube.

While metal and cross-linked polyethylene PEX (or “plastic” piping) are available as alternatives, most water heaters feature standard plastic dip tubes that are subject to the same wear and tear as any other part of your water heater. As a result, these types of tubes tend to break down and decompose more quickly than other types. They may also disintegrate, scattering white plastic particles throughout your house.

If you suspect your water heater’s dip tube is worn out, start by turning off power to the unit at the circuit breaker. Then disconnect the pipe from the cold water inlet at the top of your water heater. It’s usually a short piece of pipe threaded on both ends that you’ll need to remove using a flat screwdriver. Once you’ve removed the old tube, drain and flush your water heater to get rid of any remaining plastic flecks.

Once you have the new dip tube, reconnect the water line and turn on your hot water heater. It’s best to do this while the unit is still full of water so you can see if it works properly. Be sure to use plumber’s tape to seal any possible leaks between the connections of your water heater and the new parts. After the tank refills, turn on a faucet in your home to check the water temperature. If it’s warm, then your water heater’s dip tube is working correctly. If not, you’ll need to replace it again.

The Pressure Valve Is Broken

The temperature and pressure relief valve is one of the most important safety features on your water heater. It helps to keep your hot water tank from exploding by letting out a small amount of steam, heat, and pressure when it gets too high. In most homes, this pressure is relieved via a pipe (usually copper), which runs from the valve on or close to your water heater to a floor drain in your mechanical room. If you notice that your pressure relief valve has started to leak, you should give your local plumber a call immediately.

The main function of your water heater’s pressure valve is to help protect the tank from too much heat or pressure inside the tank, and this can be dangerous for your home’s plumbing. The tank is designed to handle a certain level of pressure, but when the pressure gets too great, the tank can’t hold it anymore, and the result can be a violent explosion that launches the water heater like a missile and causes major damage to your property.

In most cases, when the pressure valve becomes faulty and starts to leak, it’s due to a sticky valve lever. When this happens, the lever is stuck in either the closed or open position and can’t do its job. If left untreated, this can lead to a tank rupture that floods your home with hot water.

This is another problem that can easily be fixed by a professional, and if you’re handy with tools, you may be able to do it yourself. The first step is to make sure that your valve isn’t leaking by turning off your water supply, disconnecting the gas line (if you have one), and removing the discharge tube from the bottom of your tank.

Once you’ve disconnected everything from your water heater, you can start to take apart the pressure valve. Make sure you’re wearing protective gear while doing this, as the job can be dangerous if the water is hot enough to burn your skin. Once you’ve taken apart the valve, it’s time to start replacing the parts.

Plumbing

The Essentials of a Plumbing Installation

Bryco Plumbing is essential to building a new home or adding onto an existing one. While the specific considerations and legal processes vary by region, some basic guidelines remain universal.

The first step is to map the system with a detailed plumbing diagram. This is done during the rough-in plumbing phase, which occurs after the framing and before hanging drywall.

 Plumbing

The supply lines in a plumbing installation provide water to all the fixtures and appliances. They are usually made of copper piping due to its flexibility and corrosion resistance. However, other materials can be used, such as plastic piping or galvanized steel pipes. The pipes may be either pressurized or unpressurized. They may be buried underground or run inside the walls and ceilings of the building. A plumber must make sure that the pipe size is sufficient to deliver water at the required pressure. The piping layout must also be determined. This involves calculating the number of water supply fixture units (WSFU) served by each pipe section. It also includes determining the water flow rates and velocities, and checking that they comply with the governing plumbing codes.

New home constructions are on the rise, and so is the demand for plumbing services. Whether you’re building from scratch or looking to renovate your existing home, you need to know that you’re hiring the right people for the job. Plumbing is not as simple as it looks, and it can be quite confusing for the uninitiated. To make things a little simpler, it helps to break the process down into three easy steps.

In the first phase, the plumber sets the sewer accommodation stubs. These are the points where the home’s sewer line connects to the main drain line. This must be done before the concrete foundation is poured. Next, the plumber roughs in the piping. This means laying the basic lines without making any of the final connections. This is normally done before the drywall is hung. The toilet flanges and the water supply pipes are set at this stage, as well as any other large fixtures such as bathtubs and showers.

In the second phase, the plumber installs the drains and vents. This is the most important part of any plumbing installation. It is essential to have proper drain placement and routing to avoid clogs, backflow, and other problems. The plumber must ensure that the pipes do not cross over each other and that they are properly sized to accommodate the fixtures that will be connected to them. The plumber must also ensure that all the vents are connected to a common point and that they are properly sealed. This step is vital for preventing sewer gas from entering the house.

The drain system removes wastewater from sinks, tubs, showers and toilets. It transports waste to the sewer system, where it either enters the municipal sewage line or a private septic tank and treatment system. In the latter case, the septic tank handles the anaerobic breakdown of sewage before it’s shuttled to a wastewater reclamation plant.

Like the supply line, drain pipes must meet specific size and slope requirements to prevent clogging and overflow. A plumber measures a space to determine the required pipe diameter and its length. Then, the plumber opens up the wall to install the pipe and applies plumbing adhesives and sealants as needed. The plumber may also use plastic sheeting to protect the floor and walls from damage.

Once the plumbing pipes are in place, a plumber connects water faucets to the pipes. Each fixture requires a unique connection, but most plumbers use push-fit connections for quick installation and removal. Then, they test the connection for leaks and proper flow.

Another important part of plumbing installation is the main drain stack. This is the vertical pipe that all other drain pipes feed into. It’s usually 1 to 1.5 inches in diameter, and it slants downward with a slight downward angle to help wastewater flow freely. The top of the main stack also has a vent to allow air into the plumbing system.

Every drain pipe must have a trap, as well. A trap ensures that methane and other foul-smelling gasses don’t enter living quarters. The trap also catches any debris that might have fallen into the drain, such as food scraps or cleaning products.

Each fixture’s drain pipe must also be compatible with the drain stack’s size and slope, as well as the type of wastewater it produces. For example, a dishwasher’s wastewater is much thicker than a toilet’s, so the dishwasher’s drain pipe must be larger to accommodate the liquid.

During the plumbing installation process, the plumber may also create a diagram of the system’s layout and its pipe sizes and fittings. This helps with inspections and allows for any future repairs to be made easily. In addition, all plumbing installations must comply with local and state building codes to avoid fines and other problems. While these codes vary by region, most abide by the National Uniform Plumbing Code.

The plumbing vent, also called a drain stack or an air vent, regulates air pressure in your drainage system. It admits air as wastewater drains and removes gasses and odors from the house. The stack connects to the waste drains in your home and can tie into the city sewer system or a personal septic tank. The stack must be properly installed to ensure air can circulate in your drainage pipes and prevent water from building up.

Your drainage system has a vital role to play in your health and well being. It’s critical that you know how your drainage systems work and what problems to look for, such as a slow-to-draining sink or tub. These issues could signal a blockage that requires a professional plumber to solve.

A blocked plumbing vent can cause a negative pressure buildup in your drains. This can interrupt the flow of water and even cause a sewage smell throughout your home. If you notice these symptoms, contact a professional plumber right away.

Blocked plumbing vents occur when the p-trap’s vital water seal breaks due to pressure fluctuations inside your drainage system. Then, sewer gases can siphon into upstream drains and your home.

To avoid this, it’s important to keep your plumbing vents clear of debris and clogs. You can do this by checking your p-traps regularly for water seals and making sure they have proper ventilation. You can also use a drain snake or auger to break up any clogs you find.

When planning your drainage vents, you can consult a professional plumber or do it yourself. If you’re doing it yourself, be sure to follow local plumbing codes and regulations for wet or dry venting. Also, choose a pipe that’s the right size and pitch for your project. The route your piping takes through wall framing will also have an impact on drainage.

To install a plumbing vent, you’ll need to buy the appropriate pipe and a variety of fittings. You can get these supplies at your local hardware store. The store’s employees can help you plan out your layout and ensure you have the right parts for your job. They can also explain the different types of pipe and recommend what kind of fittings to purchase.

There are a wide variety of plumbing fixtures available. Some are very simple and utilitarian, while others add to the decor of a home or business. Some of the most basic fixtures include toilets, faucets, showers, and bathtubs. Other fixtures include garbage disposals, dishwashers, and water heaters. These fixtures are essential for the proper function of a plumbing system, as they provide clean water and waste management. They also play an important role in the overall safety and hygiene of a building’s occupants.

A plumber can install any type of plumbing fixture that is available on the market. However, it is always best to consult a professional before installing any kind of fixture in order to ensure that it meets all local codes and regulations. It is also essential to make sure that the fixture is compatible with all of the pipes and fittings in the plumbing system.

Plumbing fixtures are usually connected to the main line via a valve. Most of the time, these valves are located at the end of each fixture riser. Each fixture has a different way of connecting to the pipe, and it is important that the correct type of connection is made in order to prevent leaks.

It is normal for each fixture to have a water supply line, and most of the time, this will be both hot and cold water. Some fixtures will only have a potable (drinkable) water supply, while others will only have a non-potable (washing) water supply. Each of these fixtures will need a valve to control the flow. It is also common for each fixture to have a drain, which will have a device that can be used to plug the drain in case of an emergency. Most drains will have a flood rim level, which is the point at which the fixture will overflow.

A plumbing fixture is defined as any installed receptacle that receives liquid or sewage wastes, and which discharges these into the sanitary sewerage system with which it is connected. This includes, but is not limited to, septic tanks and systems, grease traps, interceptors and separators, roof drains, backwater valves, testable backflow devices, expansion vessels and water heaters.