Cleaning Services

Why Roof Cleaning Is Important

Roof Cleaning Sarasota helps protect a home from water damage, which can cost thousands of dollars. It also makes the house more comfortable to live in and increases the property’s value.

Roof Cleaning

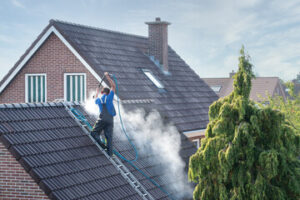
Professionals usually spray a solution of bleach (the same kind you use to whiten laundry) and water onto the roof. This kills off algae and moss growth.

Algae, also known as cyanobacteria or slime mold, are primitive plants that thrive in water and on wet surfaces such as roofs. They can be black or green in color and create unsightly stains on the surface of your roof. Algae growth on a tile roof can discolor the tiles, absorb heat unevenly, and promote the growth of other organisms such as moss and pests. It is important to remove algae from your roof as soon as you notice it growing. This will help to prevent the spread of the spores to other parts of your home and property.

The best time to remove algae is during spring or summer when the weather is drier and warmer. Using a professional roof treatment during this time is an ideal way to kill the algae and clean up your roof. It is a much safer and effective way to remove the growth than using a power washer or a scraper, which can damage your roof.

Generally, roof algae grow because of a combination of factors. Overhanging branches, clogged gutters, standing water, porous roofing materials, and poor ventilation can all contribute to the growth of algae on your roof. Once the algae begins to grow, it can be difficult to remove.

The easiest and most common method for removing algae from your roof is to use a bleach solution. The bleach will kill the algae and moss, allowing you to scrub away the stains. Be sure to test the solution on a small section of your roof before applying it to the entire surface. This will ensure that the bleach won’t damage your roof or void your warranty.

You can also use a product called Spray & Forget Roof Cleaner, which is a biodegradable and non-corrosive solution for removing algae, mildew, moss, and lichen from shingle roofs. This product can be purchased online or at most home improvement stores and is an effective alternative to power washing or scraping moss and algae. The cleaner can be applied to the roof with a pump sprayer and will need to sit for about 30 minutes. Then, you can rinse the solution off with a garden hose to remove any remaining traces.

Debris

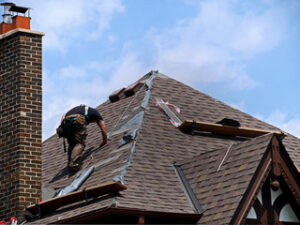
The roof is one of the most important features of your home, as it protects you and your family from the elements. But, like any other part of your home, the roof needs to be cleaned on a regular basis to prevent build-up from occurring. Debris on the roof can create a lot of problems, including attracting pests and clogging gutters. In addition, debris can also damage the structure of your home. Keeping your roof clean will help to protect your investment, and it will also increase the overall value of your home.

To remove any debris from the roof, start by sweeping it thoroughly. Then, spray a solution of water and detergent on any areas where you see black stains or growths. The solution will dissolve the dirt and grime, making it easier to clean the rest of your roof. You can use a commercial roof cleaner or you can make your own cleaning solution using mild soap and water. Just be sure not to get too close to the surface, as you could damage your roof or hurt any plants that are in close proximity.

If you have a lot of debris on your roof, you may want to consider hiring a professional to do the job for you. However, if you’re going to attempt to do the job yourself, it is best to start with a broom and sweep as much debris as possible. Then, move to a leaf blower or other power tool that will help you to quickly and easily remove any remaining debris.

You should try to do this work on a day with clear skies and minimal wind speed. This will reduce the risk of any fallen debris hitting anyone below. Also, low wind speeds will mitigate the possibility of blown debris landing on workers and creating trip or slip hazards. If you have a skylight or chimney on your roof, be careful to avoid aiming the blower at those structures, as they could be damaged. Lastly, you should take special care to cover any items of value in your house or garage before starting the roof cleaning process.

Dirt

Dirt, sand, dust and other outdoor materials can make their way onto a roof and cause it to look grimy. Roof cleaning removes this dirt and helps to prevent it from building up again.

A dirty looking roof can reduce a home’s curb appeal and lower its value. Regular roof cleaning can keep a roof looking its best and can prolong its lifespan.

Asphalt shingles have come a long way in the last few decades and are less prone to moss and algae growth and those unattractive black streaks, but dirt and environmental factors can still wear away at the life expectancy of your roof.

Cleaning your roof can be done manually with a broom or leaf blower to remove loose debris such as pine needles, branches and leaves that can trap moisture close to the surface of the roof. This constant moisture can also help moss grow, and if left untreated moss can damage the shingles and lead to water leaks into your home.

If you want to do your own roof cleaning, it’s important that you use proper safety equipment. This includes a harness and fall arrest equipment to ensure that you don’t slip and hurt yourself. Additionally, you should also wear protective clothing including long pants, a long-sleeve shirt and gloves, and a mask to protect yourself from the chemicals in many cleaning products.

When cleaning a roof, it’s generally a good idea to start from the top and work your way down, rather than trying to cover as much area as possible at one time. This will give you a chance to spot any problem areas that may need additional attention or repairs before they get worse.

You can use a variety of cleaners to clean a roof, but bleach is usually the best option. The chlorine in the bleach can kill off any moss or algae growth and also helps to remove any dirt or grime that has built up on the surface of the roof. Be sure to choose a low-VOC bleach that won’t harm surrounding plants and trees.

Mold

Mold is something homeowners don’t want anywhere in their homes, especially on the roof. It’s a sign of more serious issues like leaky roofs and poor ventilation, and it’s not good for anyone’s health. If you find spots of mold growing on the roof, it’s important to remove them as quickly as possible to prevent further problems.

Mold can be difficult to spot, especially since it typically grows in dark areas that are largely hidden from view. However, the best way to check for mold is by doing a thorough roof inspection. This is also an ideal time to look for other signs of problems, such as discoloration on the attic floor or in drywall around windows.

If you do suspect you have a mold problem on the roof, it’s best to contact a professional roof cleaner to make sure the job is done correctly and safely. Professionals will know how to use a special product that kills mold and keeps it from returning, as well as other products that won’t damage the roof or leave behind spores that can grow into more mold.

The most common way to remove mold from the roof is to spray it with a bleach solution. However, it’s important to be careful during this step and wear rubber gloves and a respirator. If you don’t, the mold spores will spread into your home and cause further damage. It’s also a good idea to rinse the roof after spraying it with clean water. It’s important to avoid using a power washer because this could damage the shingles and leave them vulnerable to future damage.

In addition to using a bleach solution, many professional roof cleaners also use a product called D7. This is a powerful algae and mold killer that can be applied as either a foam or a spray, making it easier to reach hard-to-reach places. It also clings to the surface of the roof, so it’s less likely to wash away before killing any mold spores that are present. It’s best to apply the product during cool or cloudy weather so it doesn’t evaporate before it has a chance to work.

Balcony Inspection Services

Why It’s Important to Have a Deck Inspection

Decks are where many of life’s moments happen – from family barbecues to quiet evenings under the stars. Proactive maintenance and regular inspections help ensure that your deck will be safe and enjoyable for years.

Deck Inspection

It’s not uncommon for wood to crack over time, but small cracks are not a cause for concern as long as they don’t grow. Inspectors will be checking for cracks around fasteners and between joists. For professional help, contact SB 326 Inspections.

Your deck is a place where you and your family relax, spend time with friends, and enjoy the Denver weather. However, if it isn’t properly maintained, it can become a safety hazard, and even collapse over time. This is why regular deck inspections are essential.

Professional inspectors can identify problems and make recommendations that will prevent these issues from escalating into large-scale problems, and help you maintain your deck for years to come.

Structural support refers to the framing boards and beams that keep your deck stable. Inspectors will look for any rot or significant breakage in these elements. They will also assess whether these components are the correct size to provide sufficient support. For example, joist hangers must be the right size to effectively support the joists, and span braces must be installed correctly to prevent movement in the deck structure.

In addition, deck joists should be adequately supported by the ledger board and the foundation. This will prevent sagging and other structural issues that can compromise the stability of the entire deck. The inspector will also inspect the ledger board, looking for signs of rot or damage. He or she will also look for the correct fastener type and spacing to ensure the proper attachment of the ledger board to the house and joists.

Finally, the inspector will look at the deck stairs and railings for any issues that may impact safety. For example, stair stringers must be securely attached and have the correct height and width to accommodate safe use by children and adults. Stair railings must meet code requirements for height and spacing of balusters, and they must be sturdy enough to hold a person’s weight.

With these and many other important considerations, it is vital that homeowners have a professional inspection of their deck. This will help to ensure the safety of those who will use it, and save them money by identifying issues that need to be addressed promptly. This will also help to avoid larger, more costly problems that could result in a dangerous situation or collapse.

Floorboards

A deck inspection includes a close look at floorboards and joists. Ideally, they should be sturdy and well-maintained, with no signs of rot or decay. They also need to be securely fastened to the deck framing and ledger board. If a joist shows signs of warping or cupping, it may be time to replace it. Loose floorboards are a major safety concern, especially for guests who might be standing on them when they give way.

A good deck inspector will also check for any signs of moisture damage, such as rotting wood or mold and mildew. Mold and mildew growth can be a problem for any type of deck, but it’s particularly dangerous when it comes to steps, as they can quickly become slippery.

In addition to looking for structural issues, a good deck inspector will also examine the deck’s cosmetic features. For example, if the deck has a green tint and has lots of mildew buildup on its railings, it needs to be cleaned and treated as soon as possible. Otherwise, the mildew could wear down the integrity of the railings, which is a serious safety hazard for any guests who might lean on them.

Depending on how the deck was built, it’s sometimes necessary for a professional to perform a “hammer test.” This involves hitting the decking boards with a hammer to hear if they ring hollow. A ringing sound means that the decking is loose and should be tightened.

Other common problems with decks are ledger boards that pull away from the home or building or inadequate lateral bracing. These are often caused by a lack of proper footings or joist spacing, and they’re typically beyond the scope of a visual inspection.

For a more thorough examination, a professional might have to dig down around the deck posts and use a pick to probe underneath them for signs of decay. It’s important for decks to have concrete footings that sit at least below the frost line, which in Michigan is 42” below grade.

Railings

The deck is a place for social gatherings and family relaxation. However, it’s important to make sure the deck is safe and up to code before you invite guests and enjoy the summer sun or a cozy winter night outside. An inspector will check for safety hazards like loose railings, rotting and unstable supports, and stairways that are too steep or unsafe.

Stairways are where most deck related injuries occur. They can be very dangerous if they are unsteady, causing guests to fall and sustain injuries. Qualified inspectors will inspect the stairs for stability and proper height, checking the handrails for safety and comfort. They will also look for any signs of insect damage, such as holes in the wood, which may indicate that termites or other insects have been attacking the deck.

A faulty deck can be a major hazard, especially if you’re hosting a party or having family over for a barbecue. In addition to being unsafe, it can also be a fire hazard. That’s why it is important to have a qualified inspector inspect your deck regularly to ensure it meets all local and national codes for fire safety.

Decks that are inspected often and properly maintained can last longer and remain in better condition, extending the life of the deck and ensuring it remains a pleasant outdoor living space for years to come. A routine inspection will help you avoid costly repairs in the future and prevent expensive structural damage.

When a professional inspector conducts a deck inspection, they will use a comprehensive checklist to check the integrity of the framing, the condition of the deck boards and the functionality of all built-in features like stairs, railings, and lighting. They will also verify that the structure is up to code and looks like it was built as per the plan. They will also test the electrical connections and ensure that all lights are working properly. Moreover, the inspector will also ensure that the deck has a proper drainage system and any water sources are properly protected. Additionally, they will make sure that the deck is free from mold and mildew that can cause slips and falls.

Under the Deck

While the structure of a deck is usually pretty clear, it’s important to look at less obvious areas to ensure that the whole deck remains safe. For instance, the deck’s footings are a key part of its stability and safety, but examining them can be challenging as they’re under ground. The best way to test the condition of a deck’s footing is to use the “pick test” and place the tip of a long, slender screwdriver into the wood. If the tip easily bends or splinters, it’s likely that the wood is rotted or decaying and may not be strong enough to support the weight of a person walking on the deck.

Decks are also built with framing and joists, which must be inspected for the proper size of nails used and for any aspects that could make the deck unsafe, such as white stains or rust on the fasteners and joist hangers. If they’re not properly installed and maintained, these components can corrode over time and can cause water damage to the house and other structures beneath the deck.

Staircases on decks require special attention, as they’re the site of many accidents due to slipping and falling. An inspector will check the stairs for any signs of rot, but they’ll also take into account the ergonomic design and flow of the staircase to make sure it’s comfortable to walk up and down and not too steep or dangerous for elderly or disabled people who use the deck.

Another area of the deck that requires inspection is its piers, which are concrete foundations that help hold and support the deck. The inspector will verify the location, dimensions and depth of the piers, as well as check that the soil is suitable for the purpose of the deck.

In addition to the structural components, a deck must have adequate flashing and attachments to be safe to use. The inspector will check the condition of these components and make sure they’re correctly installed and in good condition, such as checking that all flashing is fully seated, not cracked or damaged, and has no leaks or other aspects that could compromise the deck’s integrity or safety.

Plumbing

How Water Filtration Enhances the Quality of Drinking Water

Water Filtration Atlanta is a crucial step in the process of treating your tap water. It helps to remove sediment and other pollutants that can damage your plumbing or cause bad taste and odors.

Filters are available in many different forms, from bottled water to at-home filters. Each type works differently, so it’s important to read the label carefully to understand what contaminants each filter is certified to reduce.

Reverse Osmosis

plumbing

Reverse osmosis water filtration is one of the most advanced forms of home water treatment available. Its powerful technology makes it possible to remove most dissolved solids, such as sodium and chloride, from drinking water. This makes it safe for drinking and cooking. In addition, it helps remove dangerous bacteria and other pathogens that can cause illness.

Reverse Osmosis uses a semi-permeable membrane to filter contaminants on a molecular level. This process separates water from dissolved salts and minerals, making it clean and healthy for drinking. It can also remove organic contaminants, such as viruses and bacteria, and unpleasant odours and tastes. The membrane is made of cellulose acetate, polysulfonate, or polyamide. It is typically surrounded by a pre-filter that removes large particles from the water. This step prevents the build-up of contaminants on the membrane surface and extends the lifespan of the RO membrane.

The reverse osmosis system is designed to treat city water and private well water. It is capable of reducing total dissolved solids (TDS) in city water up to 95%. It also reduces calcium carbonate and hardness in well water up to 98%. Reverse Osmosis is very expensive to install and requires regular maintenance to keep the membranes working properly.

A reverse osmosis system works by forcing pressurized water through a series of filters and membranes. The resulting pure water is stored in a storage tank until it is needed for cooking or drinking. The system can be installed under your sink, and the piping is usually run to the kitchen faucet. The first stage in the system is a polypropylene spun sediment filter, which eliminates most visible particulate. This step reduces the number of pollutants that will clog the RO membranes and carbon filters.

Reverse osmosis is a great option for homeowners who want to improve the taste and quality of their drinking water. However, before you invest in a reverse osmosis system, you should purchase a water test kit and get a clear picture of the TDS in your water. In order to make sure you have the right TDS for your coffee, you should try to get a reading around 150ppm. This is a good amount of TDS for high-quality specialty coffee.

Activated Carbon

Activated carbon is a porous material that acts like a sponge for different gases. It can be used to remove harmful chemicals, such as chlorine and organic solvents, from water. However, it is important to understand that activated carbon is not a substitute for disinfection. Disinfection will not destroy all bacteria and viruses in your tap water, so you still need to use a filter to remove them. The best way to do this is to use a multi-stage water filter that will reduce the levels of these contaminants in your drinking water.

Depending on the application, activated carbon can be used in two ways: as a stand-alone system or in conjunction with other water treatment systems. Granular activated carbon (GAC) is available in a wide range of sizes, pore structures, and substrates. It can be purchased at a very affordable price and is extremely effective. It can be impregnated with various chemicals to increase its adsorption capacity for specific molecules.

GACs are typically sorted by their ability to absorb vapor and liquid chemicals. The most efficient GACs are those with a high molasses number and low pore size. Molasses numbers are an indication of the mesopore content of the carbon, which is important for adsorption of large molecules. They are also a good indicator of the performance of the carbon against vapor.

The adsorption capacity of GACs is affected by a variety of factors, including molecular weight and concentration of the chemical being treated. It is also important to consider the operating conditions of the system. For example, the temperature of the water, the presence of other chemicals in the stream, and the polarity of the chemicals being removed will all affect the life expectancy of the GAC.

The most common application of activated carbon is to treat PFAS/PFOS (Perfluorooctane Sulfonic Acids) from drinking water. These are synthetic chemicals that were once widely used in fire-fighting foam, metal plating and stain repellents but have now found their way into drinking water sources all over the world. Currently, there are several major incidents of contaminated drinking water in North America and Europe that have been linked to these chemicals. Activated carbon can remove 30-70% of PFAS/PFOS from tap water, but this does not necessarily eliminate them completely.

NSF-certified

NSF-certified water filters meet specific public health standards that protect the quality and safety of drinking water. The certification process is rigorous, testing over 60 parameters across material safety and structural integrity. It also includes a physical evaluation of manufacturing facilities and processes, as well as full supply chain transparency. Only products that pass this rigorous testing can receive the NSF seal. This is an important step to ensuring that your water filter will actually do what it claims to do.

NSF is an independent organization that develops and maintains public health standards for food, water, consumer products and the environment. It has been developing these standards for over 75 years and is a leading world authority in the field. Its certification program is one of the most rigorous and transparent in the industry. Its strict certification requirements include the use of BPA-free plastics, rigorous tests for contaminant removal, and comprehensive evaluation of manufacturing facilities and processes.

A NSF certification means that the product has met the minimum requirements set by NSF International. The NSF standards cover a wide range of issues, from material safety to structural integrity to contaminant reduction. In addition, NSF-certified products are independently tested and evaluated to ensure that they meet all of the certifying criteria.

Choosing a NSF-certified water filter is an easy way to ensure that you are getting the best possible filtration system for your needs. NSF-certified water filtration systems are typically made from materials that are BPA-free and free of harmful chemicals, such as bisphenol A (BPA). They are designed to be durable and long-lasting, and they are backed by extensive third-party testing and certifications.

The NSF-certified water filtration system you choose depends on the specific contaminants that you want to remove from your drinking water. For example, some NSF-certified filters are certified to reduce up to 15 different contaminants, including prescription drugs and over-the-counter medications like ibuprofen and naproxen, herbicides, pesticides and more. They also reduce perfluorooctanoic acid (PFOA) and perfluorooctane sulfonate (PFSA), which are used in nonstick cookware, fire retardant coatings and more.

Cost

Water filtration systems remove unwanted contaminants from your home’s tap water to make it safer and healthier. They also help improve the taste and smell of your water, reduce stains on clothes and dishes, and protect appliances from mineral buildup and corrosion. However, the cost of a water filter can vary widely depending on the type and size of the system. Some systems are more complex than others, and therefore, more expensive to install and maintain. In addition, some filtration systems require extra plumbing work to install properly, which will increase the overall costs of installation.

The most common way to filter water is through a carbon-based system. This method works by reducing unpleasant tastes and odors through absorption, which occurs when water passes through the carbon’s large surface area. These surfaces are packed with tiny nooks and crannies that trap chemical impurities such as chlorine. Some filters even include ion exchange materials to trap heavy metals such as lead and mercury.

Another way to filter water is through distillation. This process involves boiling the water and then capturing the condensed steam. This removes most of the chemicals and minerals in the water, making it cleaner and safer to drink. However, it does not remove all of the chemicals and minerals, so you should be cautious when using this method.

A water filtration system can range in price from $100 to $500. Higher-end models with more advanced features and higher contaminant removal capabilities are typically more expensive. However, you should remember that the initial investment will pay off in the long run as you’ll spend less on costly repairs and replacements.

Investing in a home water filtration system can save you money in the long run by protecting your appliances, improving the taste and smell of your drinking water, and ensuring that your water is free from harmful bacteria. Additionally, it will extend the life of your appliances and reduce repair costs by removing minerals from them.

Water filtration systems are available in many different forms, from whole house to individual point-of-use units that can be installed under sink, on countertops, or in pitchers. A comprehensive system will address all the issues that are present in your home’s water. This will likely be more expensive than a standalone system.

Paving

Signs That It’s Time to Seal Your Asphalt

Sealcoating is one of the best ways to keep your asphalt looking great and protect your investment. There are many signs that it’s time to reseal your driveway, parking lot, or other paved surface.

Sealcoating

Ideally, seal coating is performed on days that are comfortably dry and with no more than a 40% chance of rain. If the weather is too humid, the resulting moisture will slow drying and affect the results. Visit Website to learn more.

Asphalt is a durable material that holds up well under normal use, but it’s susceptible to damage from the sun, moisture and chemicals. Seal coating adds a layer of protection that blocks out these elements and helps your pavement last longer. It also gives your asphalt a deep black, clean appearance that enhances curb appeal.

Asphalt deteriorates when it isn’t properly maintained. It becomes dry and brittle, which allows it to crack and break apart. Sealcoating protects the surface from water, sand and oil, which extends its life and keeps it looking good. It also protects against UV rays that can cause oxidation and fade the color of your parking lot or driveway.

A regular schedule of sealcoating can more than double the life of your asphalt and save you thousands in repairs and replacement costs. Those who skip this maintenance are left with unattractive and damaged asphalt that needs costly resurfacing or even reconstruction.

Before your property can be sealed, the asphalt must be thoroughly cleaned. This includes blowing away loose dirt, sweeping and brushing. Dirt that is left on the surface can damage the new layer of seal coat. Linear cracks should be filled with a hot rubberized crack filler before the pavement is sealed.

Once the asphalt is prepared, workers will spray the area to be covered with an asphalt emulsion or acrylic sealer. This product is mixed with sand, polymer additives, silica and other proprietary fillers to create a smooth, slip resistant surface that enhances the beauty of your parking lot or driveway. The product is poured or sprayed onto the asphalt surface and spread with a broom, brush or squeegee. Workers should be mindful to avoid overspray on concrete sidewalks and garage doors, as these products can stain them.

Once the application is complete, workers must wait for it to dry completely before driving on the surface. The drying process can take 24 to 48 hours. It is best to seal the asphalt when it is warm and dry outside, but not raining. This way, the asphalt can adjust to the changing temperatures without becoming brittle or cracked.

Prevents Water Damage

While water is essential to life, it can also be a destructive force. It can erode smooth surfaces and cause them to crumble over time. Sealcoating helps to prevent this by forming a layer that acts as a protective shield against the elements, including UV damage and rain damage.

Without sealcoating, asphalt is vulnerable to water infiltration, which can destroy the underlying structure and shorten its lifespan. However, when your pavement is sealed with a high quality product, the liquid emulsion fills up any pores or cracks, creating an impermeable layer that stops moisture from damaging the asphalt. In turn, this minimizes the impact of traffic-induced stress and keeps your pavement structurally sound for longer.

Water infiltration is a major problem for untreated asphalt surfaces, particularly in wet climates where rain and sprinklers can frequently seep into the surface. This can lead to oxidation and further damage to the structure of the asphalt, which leads to potholes, surface cracking and deterioration. Sealcoating protects your asphalt by preventing water from penetrating the surface and strengthening the subbase to create an impermeable layer that resists moisture and other harmful substances.

A paved driveway or parking lot is subject to many stresses, including the abrasive action of tires and the weight of vehicles. This inevitably leads to surface cracking and deterioration. A properly applied sealcoat can significantly reduce the impact of these stresses on your asphalt, extending its lifespan and improving its appearance.

While you can try to apply a sealcoat yourself, the best way to ensure that your job is done correctly and effectively is to hire a professional. They will have access to specialized equipment and tools that you may not have, such as spray systems designed to apply the sealcoat evenly. In addition, professional sealcoat applicators will use premium grade products that are formulated to provide the best results. In addition, they will use a power washer to remove any chemicals or oils that are on the surface of your driveway or parking lot before applying the sealant. This will ensure that the sealant is applied only to the asphalt, not the surrounding environment.

Prevents Oil Spots

Oil spots are the bane of every asphalt driveway or parking lot owner’s existence. Not only are they unsightly and a turn-off to potential customers, but they can also stain and damage the pavement beneath them. Sealcoating protects the surface of your asphalt and slows the deterioration caused by spilled oil.

Gasoline, motor oil, antifreeze and de-icing chemicals can all stain and corrode asphalt. Sealcoating keeps these harmful chemicals on the surface of your pavement where they belong, rather than absorbing into the asphalt where they can cause damage and contaminate groundwater supplies.

Another way that sealcoating helps to protect the asphalt beneath it is by filling in hairline cracks. These cracks can widen over time to become potholes, which are a danger to drivers and passengers. Sealcoating helps to prevent this by sealing the cracks and keeping water out, which can prolong the life of your asphalt.

Lastly, sealcoating provides cosmetic benefits. Over time, your asphalt will lose its black color and begin to look dull and grey. A fresh coat of sealant can restore the black appearance of your driveway or parking lot and make it more attractive to customers.

When having your asphalt sealed, it is important to follow all instructions provided by the company. This means not spreading fertilizers or other chemicals whose fumes can interfere with the process, as well as closing your parking lot while the work is being done. If you are unable to close your parking lot, you should try to limit traffic to one area while the work is being done.

A professional sealcoating service will use a high quality product to ensure that the results are as good as possible. Depending on the brand, it may contain additives to aid in drying, altering sand suspension, increasing water repellency or improving resistance to salts and petrochemicals.

It’s also important to have your asphalt sealcoated on a regular basis. A typical schedule is about once every three years, although this may vary slightly depending on the climate in your region and the amount of traffic on your parking lot or driveway.

Prevents Potholes

A cracking, crumbling asphalt driveway or parking lot is not only an eyesore but it can also be a safety hazard for pedestrians. If you notice your asphalt is showing signs of deterioration it’s time to take action and get it sealed. Sealcoating is a cost-effective preventive measure that can extend the life of your asphalt pavement.

Pavement deterioration is caused by moisture intrusion into cracks and joints in the asphalt surface. When water seeps through these small holes in the asphalt and freezes, it expands, causing the weakened pavement to rip apart. If this is left unattended, it will further erode the asphalt, eventually leading to potholes or alligator cracks.

These cracks and holes in the asphalt aren’t just unsightly, but they can lower your property value and make your property look run down. This is not a good impression to give to your guests or potential customers. It can even turn off business.

Getting your pavement sealed will protect it from UV damage and slow down the oxidation process. The asphalt pavement is made up of rock and gravel, or aggregate, held together by a binder that comes from the distillation of crude oil. As it degrades, the binders and aggregate separate from one another and deteriorate the pavement. Sealcoating helps preserve your asphalt for pennies per square foot compared to costly repairs and replacement.

Sealcoating is a liquid mixture that’s spread and hardens into a thin layer on top of your asphalt. It acts as your pavement’s first line of defense against corrosive chemicals, sun’s UV rays and water. It is best applied by hand with a squeegee or with a sprayer, depending on the size of the area to be coated. It is often mixed with sand for added consistency and traction.

While sealcoating is not a structural improvement, it can be an effective method to maintain your asphalt and make it look brand-new. It will not hide large cracks, dry patches or other areas that have a compromised structural integrity and those should be repaired prior to seal coating. However, it can hide smaller cracks and prevent them from eroding into larger ones.

Electricians

A Career As an Electrician

A career as an electrician involves working with electricity and a lot of physical work. This is a good career choice for people who like hands-on and challenging work.

After earning a high school diploma, you can start your journey to become an electrician by attending classes at a trade or vocational school. You can also join an apprenticeship program. Contact Electricians Fort Worth now!

The electrical power, communications, lighting and control systems that keep homes, offices and factories comfortable and productive are designed and maintained by electricians. They work in many different settings to ensure that all electrical work meets local and national safety standards and codes. This includes repairing existing electrical wiring, equipment and fixtures and installing new ones when building a home or commercial or industrial structure. Electricians also perform diagnostic testing to identify and address issues with existing electrical components and connections.

An inquisitive mind and problem-solving skills are important for an electrician. The ability to interpret blueprints and electrical diagrams is crucial, as is the ability to use a variety of hand and power tools, such as screwdrivers, wrenches, soldering irons and test equipment like volt-ohm meters and circuit testers. Math skills are needed to understand electrical formulas and conversions. High school vocational courses, such as drafting, blueprint reading and introductory electronics, can help prepare students for an apprenticeship with a master electrician.

In addition to technical and mechanical abilities, electricians need strong interpersonal skills to interact with customers, colleagues and suppliers. They must be able to communicate clearly and concisely both verbally and in writing, as they often must explain complex processes in ways that non-technical individuals can understand. Good customer service is essential to establishing and maintaining relationships that can lead to repeat business and referrals.

While working on a job site, electricians often spend long periods of time standing or kneeling, as well as climbing ladders and scaffolding. They may need to wear a hard hat and use goggles to protect themselves from flying debris or hazardous materials. They also need to be physically capable of pulling insulated wires through conduits, as they often install electrical devices in partitions and walls or behind other obstructions.

Experienced electricians are also knowledgeable about safety protocols and can advise clients or other contractors on how best to maintain electrical systems. They often collaborate with engineers, architects, construction professionals and project managers to ensure that all electrical installations are up to code. Some electricians specialize in specific types of electrical equipment and wiring, such as voice-data-video or fire alarms, while others are generalists who can handle most tasks on a job site.

Education Requirements

A career as an electrician requires a combination of formal education, apprenticeship, and lifelong learning. This field is continually evolving as new technologies enter the market and existing ones improve. Electricians must have a strong understanding of electrical theory, manual dexterity, and problem-solving skills to complete their job duties safely and effectively. They also need to be familiar with and adhere to state and local electrical codes and safety protocols.

The minimum educational requirement for a residential electrician is a high school diploma or GED certificate. However, those who wish to advance in the industry may pursue a vocational degree from a trade school. Students in a vocational school can benefit from hands-on training in labs, ensuring that they acquire the skills necessary to work safely in the field.

Students should choose a program that specializes in electrical technology, and focus on courses that provide a well-rounded understanding of the trade. Course lessons should cover blueprint reading, wiring, voltmeter and ohmmeter use, and the fundamentals of AC circuitry. Students should also consider a minor that complements their electrician studies. A minor in computer networking, for example, can help hone the skills of those who wish to work on Smart Home and IoT installations. A minor in renewable energy systems can also be valuable for those who wish to work on alternative energy projects.

Apprenticeship programs are also a great option for those looking to enter the field of electrical engineering. These programs combine paid on-the-job training with classroom-based instruction. An apprentice can expect to spend 4-5 years in an apprenticeship, and after completing the program, they will be licensed as journeymen electricians.

Many electricians choose to obtain professional certification, which demonstrates their specialized knowledge and skills to potential employers. In addition, obtaining a professional certification can open the door to higher-level positions in the field. Other options for gaining practical experience include volunteering for community projects that involve working with electricity, and taking on DIY electrical projects in the home, under the guidance of a licensed electrician. Finally, networking with other professionals in the field can be a great way to discover opportunities or find mentors.

Training Requirements

Electricians are skilled tradespeople who work to install, repair, and maintain electrical wiring, fixtures, and equipment. They use their knowledge of electrical theory and manual dexterity to solve complex problems. They must also be familiar with the latest industry safety protocols and procedures. The training requirements for becoming an electrician vary by state, but a formal education and extensive hands-on experience are usually necessary.

Many vocational schools offer electrician training programs, which typically include classroom instruction and hands-on labs with real-world scenarios. Choosing an electrician program with an up-to-date curriculum that reflects current industry practices is important, as it can shorten your apprenticeship time and get you on the job faster.

Those who wish to advance their careers may choose to pursue a bachelor’s degree in electrical technology. These two-year degrees provide a solid foundation in circuitry, systems design, and safety practices. Some students specialize in areas like renewable energy to expand their career opportunities and expertise.

In addition to classroom instruction, an apprentice must complete a formal internship or apprenticeship to learn the ins and outs of the trade. An apprenticeship can last up to four years and provides an opportunity for new electricians to gain practical experience under the supervision of experienced journeyperson electricians.

Licensing is required for most tradespeople, and electricians are no exception. Licensing requirements vary from state to state, but in general an electrician must have a minimum of three years of experience and pass a written and practical exam to obtain a journeyperson’s license. Some states allow electricians to take an additional step and become a “field safety representative” (FSR). These credentials enable them to perform more advanced, dangerous electrical work, such as pulling permits.

Other qualifications for becoming an electrician include excellent mechanical skills, which are vital for installing and repairing electrical equipment. Additionally, they must be comfortable working in confined spaces. Because the field is constantly changing with technological advancements, it is important for electricians to commit to lifelong learning and participate in ongoing professional development. This can be done by attending workshops and seminars, as well as reading industry publications.

Work Environment

Working in the electrical industry can be physically demanding and requires adherence to strict safety standards. However, it can also be highly rewarding, as skilled electricians are in high demand and provide a critical service that is essential for the function of many modern systems. Because of these challenges, work-life balance is vital for electricians to maintain a healthy lifestyle that supports both their physical and professional performance.

As an electrician, you are responsible for installing, maintaining, and repairing a wide variety of electrical wiring, fixtures, and equipment in residential, commercial, and industrial settings. Your duties also include inspecting and testing electrical equipment to ensure compliance with applicable codes and standards. Additionally, you may be on call to respond to emergency calls and must complete necessary paperwork, such as inspection reports and invoices.

Electricians often find themselves working in tight spaces or on heights, and your job can also involve a lot of local travel. Depending on your specialization, you may need to operate company vehicles and be responsible for the maintenance of tools and other equipment. You must also wear personal protective equipment, including hard hats and gloves.

Those who work as service technicians can expect to spend the majority of their time on-site during installation and repair projects. This means that you cannot always work from home, though some aspects of your role, such as planning and administrative tasks or customer consultations, can be completed remotely.

Mid-level Electricians can typically handle more complex projects independently, and you may begin to specialize in specific areas of electrical work. You can also take on supervisory roles, mentoring apprentices and leading a team of electricians. In some instances, you may even own or manage your own electrical company or hold a managerial position at a larger electrical firm.

Regardless of your career progression, it is important to have a good work-life balance to stay healthy and happy. Having flexible schedules and a well-balanced lifestyle can help you avoid burnout, which can lead to decreased productivity and a greater risk of injury or illness on the job. You can achieve a successful work-life balance by taking regular breaks to relax, prioritizing self-care, and scheduling time for family and friends.

Home Improvement

Why Choose Epoxy Flooring?

Epoxy floor coatings are a stylish and durable way to keep your garage, workshop, or warehouse looking its best. Certain epoxies have additives like gravel, aluminum oxide, or polymer grit to increase traction and reduce the risk of slippage.

Epoxy Flooring

These floors are also non-porous, so water, stains, cleaning chemicals and paint won’t penetrate the surface. These benefits make epoxy the choice flooring for commercial and industrial facilities. To learn more, visit https://www.surfaceprosepoxy.com/.

If you’re concerned about water damage to your floors in your home, industrial or commercial property, epoxy is a durable solution that can help. It’s easy to clean, stain resistant, and can withstand heavy traffic and impact. It also comes in a variety of colors and styles, so you can create a unique look for your space.

Epoxy floors are also chemical-resistant, making them a great choice for industrial environments where chemicals can spill or leak. This is important because chemical-resistant flooring can reduce the risk of a dangerous reaction, as well as meet industry safety standards. You can also use an epoxy coating in your garage, basement, or workshop to prevent moisture and dirt from damaging your equipment.

Before applying an epoxy floor, you should make sure the concrete surface is properly prepped and cleaned. It’s important to remove any oil, grease, or other contaminants. Then, test the concrete for previous layers of coatings by pouring a small amount of water onto it. The water should soak in, not beads on the surface. If the water beads, the concrete is not ready for an epoxy coating.

During the application process, you should use tools like squeegees and spiked rollers to ensure even distribution of the epoxy. This will also eliminate air bubbles, resulting in a smooth finish. Additionally, you should allow the epoxy to cure for the time recommended by the manufacturer. Otherwise, it may not bond with the concrete.

While epoxy is known for its durability, it can still be damaged by water and other liquids if left untreated. For example, a broken pipe, spilled mop bucket, or flooded storage room can saturate upper level floors and seep down to the lower levels. Epoxy can protect your floors from this kind of damage and keep them looking new for years to come.

If you’re considering epoxy flooring, it’s important to remember that the material isn’t impenetrable. If you want to maintain the life of your epoxy floors, it’s essential to sweep them regularly and wipe them down with a damp cloth. This will prevent mildew and mould from growing on the surface.

Chemical-resistant

Epoxy floors have become a popular flooring option for both homes and businesses. They are easy to clean, durable, and provide a beautiful look that can enhance any space. They are also a great choice for environments that are prone to chemical spills, as they can be cleaned up easily and without damaging the concrete underneath. This type of floor is a good choice for car dealerships, restaurants, and warehouses.

One of the best things about epoxy flooring is that it can withstand almost any type of chemical. This is especially important for environments that are prone to oil or chemical spills, as these substances can damage other types of flooring surfaces. Additionally, epoxy floors are impermeable, which means that they can prevent these substances from seeping into the underlying concrete and causing damage.

There are many different types of epoxy resins, and each has its own advantages and disadvantages. Some are more acid-resistant than others, and some require a special coating to protect the surface from chemicals. For this reason, it is important to research the different options available before choosing a flooring solution.

In addition to being chemical-resistant, epoxy is extremely durable and long-lasting. It is also non-porous, which makes it resistant to stains and bacteria. Additionally, epoxy is easy to clean and can withstand harsh cleaning products. This will reduce your overall maintenance and cleaning costs.

The durability of epoxy flooring is a result of its high-density polymer structure. This material is able to withstand the stresses of heavy equipment and machinery, as well as high temperatures. The hardness of the epoxy also makes it resistant to cracking and peeling.

Epoxy is available in a variety of colors and can be applied to most surfaces, including concrete. Some types of epoxy are solvent-based, while others are water-based. Solvent-based epoxies are more volatile and emit odors, while water-based epoxies do not. However, solvent-based epoxies have a shorter life span than water-based ones.

It is important to choose a quality installer when choosing an epoxy floor. A bad installation job can damage the integrity of your new floors, which will require costly repairs. In addition, a bad installation can cause the epoxy to chip or peel. To avoid these issues, it is best to work with an experienced contractor who specializes in the installation of epoxy floors.

Durable

If you’re looking for a durable floor, one that can withstand the pressure of heavy machinery and daily foot traffic, epoxy flooring is an excellent choice. In fact, it is up to three times more durable than concrete floors and is a great option for industrial settings. This material can withstand high impact, is resistant to corrosion and chemical spills, and is easy to clean. However, it is important to note that the durability of epoxy floors depends on how well it is installed. It is important to hire a certified flooring specialist to ensure the installation of the epoxy flooring is done correctly and meets strict Australian standards.

The best way to keep an epoxy floor durable is by implementing regular maintenance practices. This includes sweeping or vacuuming the floor regularly to eliminate dirt, debris, and abrasive particles that could scratch or damage the surface. In addition, cleaning the floors with a non-abrasive solvent will help to reduce stains and maintain a glossy appearance.

Another way to protect your epoxy floor is by using walk-off mats and entry rugs. This will reduce the amount of dirt and moisture that is tracked onto the floor, preventing damage and increasing longevity. It is also important to conduct regular inspections of the floors to identify any areas that need attention and repairs.

Finally, it’s also important to consider the type of epoxy product you use. 100% solids epoxy does not contain any water or solvents, which makes it less expensive than other coating products. However, it is important to understand that a 100% solids epoxy will have a shorter pot life, and must be used immediately after mixing.

Epoxy flooring is a durable, long-lasting floor that looks beautiful and provides an attractive finish to your home or business. Its hardness and strength make it a suitable alternative to many other flooring options. It can withstand the pressure of heavy machinery, chemical spills, and daily foot traffic. It is also resistant to scratches and abrasions, making it ideal for commercial applications. In addition, it can be customised with decorative flakes to suit your aesthetic preferences.

Easy to clean

While epoxy floors are extremely durable, they can still get dirty. Fortunately, they are easy to clean and can be cleaned up quickly when spills happen. In addition, they are non-porous, which means that if there are oil or chemical spills, they will not seep into the floor and will be easy to clean. This makes them ideal for commercial areas that need to withstand harsh chemicals.

If a spill happens on an epoxy floor, it is best to wipe it up immediately before the liquid has time to soak into the floor. Then, use a mop and warm water to clean the floor. You should also sweep the floor regularly to remove dirt and dust. Sweeping the floor before mopping prevents abrasive particles from scratching the epoxy. A soft-bristle broom is the best tool for this purpose.

After the floor is thoroughly mopped, you can rinse it with a hose or squeegee. If the floor is very dirty, it may be necessary to scrub the area with a kitchen scrubbing sponge or a soft deck brush. If you need to scrub an area of the floor, make sure that you remove all the furniture and other objects before doing so. You should also be on the lookout for large stains, scratches, or cuts in your epoxy floor as these can cause damage to the flooring surface.

It is important to keep in mind that epoxy floors are not immune to stains from chemicals, such as oil, rust, and other toxins. You should always clean these stains from your floors as soon as they occur so that they do not soak into the concrete and cause permanent damage.

One way to avoid stains on your epoxy floor is to sweep the floor regularly and place a walk-off mat at the entrance of your garage. This will collect the dirt, sand, and moisture from your shoes, which will help to protect the floor. You can also use pads under your motorcycle jack or welding mats to prevent them from scratching the floor.

Once the floor is clean, it should be protected with a wax. A waxed floor will be much easier to clean and will help to protect the epoxy from scratching and denting. In addition, it will look shiny and new for longer.

Plumbing

What Does a Plumber Do?

Plumbing systems take away wastewater, supply hot and cold water, and regulate indoor climate through pipes, fixtures, valves and appliances. Plumbers install, repair and maintain these systems.

Plumber

Plumber St. Petersburg FL understands how different types of systems work and be familiar with building regulations and codes. They need to have the physical strength and stamina for manual labor, and be comfortable working in tight spaces.

A plumber needs a variety of tools and equipment to install, repair, and maintain plumbing systems. These tools include pipes, fittings, fixtures, valves, and other hardware. Plumbers also use specialized tools to identify and troubleshoot issues with water pressure, temperature, and other components of a plumbing system.

Plumbers often use press fitting systems to connect piping quickly and securely. These systems create a strong, lasting seal that prevents leaks. A plumber may also use a hand auger or drain snake to dislodge and clear blocked pipes. These tools are often used in conjunction with a video camera to help locate the source of a clog or other problem.

Other tools a plumber uses include a pipe cutter, power drain snakes, and wrenches. A pipe cutter can cut through hard surfaces and tight spaces. Plumbers also use wrenches to turn and remove bolts, nuts, and screws. These tools have a wide range of adjustment and feature specialized, angled jaws for all types of tasks.

Plumbers can also use a crimp tool to join multiple pieces of metal or other material together. This is especially useful for joining PEX piping, which is becoming increasingly popular in residential and commercial plumbing. A crimp tool works by deforming or squeezing one or both of the joined parts to hold them together. Plumbers may also use a hydraulic pipe bender to twist and curve pipe lines.

Finally, a plumber may need to use a gas detector to test for the presence of carbon monoxide and other dangerous gases. These devices are typically located near boilers, water heaters, and furnaces.

Plumbing is a hazardous job, and plumbers must wear safety gear to protect themselves from bacteria, viruses, germs, and chemicals. This includes a mask, goggles, and gloves. Additionally, plumbers should wear heat shields when soldering or working with hot materials.

Tools

A plumber works with a wide range of tools to install, repair and maintain pipes, tubes and supply lines. Pipework tools include cutters, a hacksaw and a pipe wrench. A plumber also needs a variety of other hand tools and specialty hardware. A deburring tool is used to smooth modification marks on pipe edges, and a reaming tool enlarges holes or openings in pipes. A roll of emery cloth is also a must for all plumbers, as it is an abrasive material used to remove burrs on pipe threads.

Other tools a plumber might use include tongue and groove pliers (also known as Channellocks or multi-grips), which have jaws that lock into place and remain parallel to grip materials. This provides extra leverage and makes it easier to turn or hold nuts and bolts. These pliers can also grip or rotate irregular objects and clamp materials. A set of needle-nose pliers is another handy plumbing tool that features long, tapered jaws that can get into narrow spaces where other types of pliers are unable to reach.

Wrenches are an essential part of any plumber’s toolkit and the most common type is a pipe wrench. It’s designed with a long handle that allows the user to tighten or loosen pipe fittings and nuts in hard-to-reach places behind sinks and faucets. Plumbers also need a set of adjustable wrenches, which have jaws that adjust to different fastener sizes. A strap wrench is a different type of wrench that has a durable strap attached to the handle for evenly distributing force when turning fasteners in tight spots.

Plumbers often work with screws, and a basic screwdriver set is necessary for the job. A typical set includes open-end, box-end, socket tube, radiator and chain wrenches, as well as Allen, basin and strap wrenches. Plumbers might also need a stubby screwdriver set, which is smaller than standard screwdrivers and can fit tiny screws found on cabinet hinges.

A plumber must also have access to pipe thread sealant, which creates a leak-free seal on threaded pipes. This is especially important when re-installing old pipes or when repairing broken threads on new pipe installations. A plumber should also have a flow rate calculator and a way to convert units of measurement.

Safety

As plumbers work in people’s homes, they must be aware of and ready to face a variety of safety risks. Some of these include:

Exposure to bacteria and germs: Plumbers have the potential to come into contact with contaminated water, rodents and other debris that can cause diseases such as Campylobacter, E. coli and Giardia duodenalis. This can lead to diarrhoea, stomach pains or cramps, dehydration and even fevers. It’s therefore important that they wear face masks and gloves and keep their tools clean.

Tools: Plumbing technicians are responsible for using various complex and specialized tools that can be dangerous in the wrong hands or used incorrectly. This puts them at risk of injury from abrasions, cuts, punctures, burns and other injuries. It’s crucial that they understand the safety measures for each tool they use and adhere to them, especially when working around flammable or combustible materials such as gas lines and steam or hot water pipes.

Working at heights: Plumbing jobs often require a plumber to climb ladders or scaffolding in order to reach difficult spots. This can pose a risk of falling which can cause serious and fatal injury. It’s recommended that plumbers take every precaution when working at heights and always use a harness, secure themselves to the equipment they are using and ensure there is someone to help them in the event of an emergency.

Eye injuries: Due to their constant exposure to foreign matter, chemicals and bacteria, plumbers are at risk of sustaining eye injuries. This can include abrasions, cuts and scratches as well as infections from bacteria or germs that get into the eyes through openings in the skin. It’s therefore important that they wear protective glasses when needed, especially when working in confined spaces or near liquids or hazardous materials.

Slips and falls: Plumbers are also at risk of slipping or tripping when working in awkward or tight spaces. This can result in bruises, sprains, fractured bones and other injuries. To avoid this, plumbers should use appropriate footwear and be careful when walking on slippery surfaces or in wet areas. They should also be mindful of their surroundings at all times and avoid distractions to prevent accidents from happening.

Licensing

There are several different paths to becoming a plumber. Some enter through a formal apprenticeship or trade school program. Others acquire the skills through hands-on training with a journeyman plumber. Some states require that plumbers obtain a license to work independently. This usually requires passing a written exam that tests technical know-how and knowledge of local plumbing codes. Additional certifications may improve a plumber’s marketability and pay.

Plumbers work in a variety of settings, including residential and commercial buildings. They often install systems in new construction, and they must be able to adapt existing systems for renovation projects. This can involve modifying pipes and fixtures to accommodate new appliances or changes in the building’s use. Plumbers also must be able to read blueprints and understand building code requirements.

Some plumbers specialize in specific types of plumbing systems. For example, one may focus on water supply or drainage systems for manufacturing facilities. They may also work on fire sprinkler systems in office buildings or hospitals. Plumbers who work on large-scale industrial plumbing equipment often need to collaborate with engineering teams to design the systems and ensure that they are integrated into the overall facility.

Plumbing technicians must be able to communicate effectively with customers. They must be able to explain complex procedures in layman’s terms and answer questions thoroughly. They must also be able to estimate project costs and timeframes accurately.

Another essential skill is critical thinking. This allows a plumber to weigh alternatives and choose the best solution for each situation. It is important for plumbers to be able to solve problems quickly and efficiently, especially when working under pressure.

Finally, plumbers must have physical strength to handle tools and heavy equipment. They must be able to climb ladders and stairs, and they may need to lift heavy objects. Plumbers who work on sewage systems must be aware of the potential risks associated with working around human waste. They can be exposed to infectious diseases such as cholera, typhoid, hepatitis, polio, cryptosporidiosis and ascariasis. These infections are typically transmitted through contact with fecal matter or vomit that enters the sewer system.

Plumbing

Water Heater Repair – How to Keep Your Water Heater Running Smoothly

Water Heater Repair Spring TX is best left to a professional plumber. However, routine maintenance is important to help keep your system running smoothly.

Water Heater Repair

If you notice a sulfur smell or discoloration, turn off your water and try draining it. This may clear up the problem. If not, the anode rod may need to be replaced.

A faulty thermostat can cause a variety of problems. It may be unable to read the correct temperature, or it may not even work at all. A malfunctioning thermostat can also lead to a tripped circuit breaker or excessive heat, both of which can be dangerous. If you’re experiencing any of these issues, you should consult a professional to fix them.

Thermostats are the brains of your water heater, controlling the temperature and determining how hot or cold the water will be when you turn on your faucets. When the thermostat isn’t working properly, it can affect the overall function of your system. Luckily, there are a few things you can try to troubleshoot your thermostat and determine the problem.

If the screen on your thermostat isn’t lighting up, it means that there is no power getting to the unit. This could be caused by a tripped breaker or an old battery that needs replacing. To resolve this issue, locate your electrical panel and find the breaker that’s dedicated to your HVAC system. If it is flipped to the “off” position, switch it back to “on.” You should also check the thermostat to ensure that the heat setting isn’t set too high.

You can check the upper and lower thermostats to make sure that they’re functioning properly by turning off the power at the service panel and removing the access panels for both. If you’re unsure how to do this, consult a plumber for advice.

Next, disconnect the power wires from both of the thermostats to isolate them and give you an accurate reading. Once the connections are disconnected, you can test each of them with a multimeter. To do this, touch one of the meter’s leads to the terminal and the other to the metal piece that connects it to the heater. Your meter’s display should show close to zero ohms of resistance if the connections are secure.

If the resistance is higher, the thermostat is defective and will need to be replaced. If you’re not comfortable working around electrical components, it’s a good idea to consult with a plumber to have them perform this task safely and correctly.

The Pilot Light Isn’t Working

In a gas water heater, the pilot light is what ignites the burner that heats the water. If the pilot light isn’t working, the gas won’t ignite and you won’t have hot water. A functioning pilot light should burn blue. If it is orange or yellow, it isn’t burning properly and won’t trigger the thermocouple to open the gas valve. Fortunately, this is an easy fix and can be done by cleaning or replacing the pilot light.

There are a few reasons why the pilot light might not be working. The first is that the thermocouple may be dirty. If this is the case, shut off the gas to your water heater, let it cool down, and then gently clean the thermocouple. If it still doesn’t light, there could be a problem with the wiring or the thermocouple may need to be replaced.

Another reason your pilot light might not be working is that the pilot tube is clogged with debris. You’ll need to remove any dirt or grime from the pilot tube and then very carefully bend it back so that the flame can touch the thermocouple.

Lastly, the gas control valve might be stuck. If this is the case, you’ll need to turn off the gas, wait a few minutes, and then turn it on again. Then you’ll need to find the reset button (often a knob) and press it while lighting the pilot light. After the pilot light lights, hold down the button and continue to do so until you see a blue flame in the gas window.

It can be frustrating when your pilot light keeps going out, especially if you have a lot of tasks that require hot water. But with some troubleshooting, you can usually figure out what the problem is and how to fix it. It’s just a matter of finding out what the issue is and whether or not you have the tools to complete the job.

The Dip Tube Is Worn Out

The purpose of a water heater’s dip tube is to keep cold water from mixing with hot water as it travels down from the tank to your faucets and appliances. This process allows hot water to flow at a higher temperature and helps your home’s plumbing fixtures stay clog-free. But constant exposure to hot water and minerals eventually erodes plastic dip tubes. If you’re experiencing lukewarm showers or notice white, plastic flecks in your sinks and bathtubs, it’s time to replace the dip tube.

While metal and cross-linked polyethylene PEX (or “plastic” piping) are available as alternatives, most water heaters feature standard plastic dip tubes that are subject to the same wear and tear as any other part of your water heater. As a result, these types of tubes tend to break down and decompose more quickly than other types. They may also disintegrate, scattering white plastic particles throughout your house.

If you suspect your water heater’s dip tube is worn out, start by turning off power to the unit at the circuit breaker. Then disconnect the pipe from the cold water inlet at the top of your water heater. It’s usually a short piece of pipe threaded on both ends that you’ll need to remove using a flat screwdriver. Once you’ve removed the old tube, drain and flush your water heater to get rid of any remaining plastic flecks.

Once you have the new dip tube, reconnect the water line and turn on your hot water heater. It’s best to do this while the unit is still full of water so you can see if it works properly. Be sure to use plumber’s tape to seal any possible leaks between the connections of your water heater and the new parts. After the tank refills, turn on a faucet in your home to check the water temperature. If it’s warm, then your water heater’s dip tube is working correctly. If not, you’ll need to replace it again.

The Pressure Valve Is Broken

The temperature and pressure relief valve is one of the most important safety features on your water heater. It helps to keep your hot water tank from exploding by letting out a small amount of steam, heat, and pressure when it gets too high. In most homes, this pressure is relieved via a pipe (usually copper), which runs from the valve on or close to your water heater to a floor drain in your mechanical room. If you notice that your pressure relief valve has started to leak, you should give your local plumber a call immediately.

The main function of your water heater’s pressure valve is to help protect the tank from too much heat or pressure inside the tank, and this can be dangerous for your home’s plumbing. The tank is designed to handle a certain level of pressure, but when the pressure gets too great, the tank can’t hold it anymore, and the result can be a violent explosion that launches the water heater like a missile and causes major damage to your property.

In most cases, when the pressure valve becomes faulty and starts to leak, it’s due to a sticky valve lever. When this happens, the lever is stuck in either the closed or open position and can’t do its job. If left untreated, this can lead to a tank rupture that floods your home with hot water.

This is another problem that can easily be fixed by a professional, and if you’re handy with tools, you may be able to do it yourself. The first step is to make sure that your valve isn’t leaking by turning off your water supply, disconnecting the gas line (if you have one), and removing the discharge tube from the bottom of your tank.

Once you’ve disconnected everything from your water heater, you can start to take apart the pressure valve. Make sure you’re wearing protective gear while doing this, as the job can be dangerous if the water is hot enough to burn your skin. Once you’ve taken apart the valve, it’s time to start replacing the parts.

Roofing

What You Need to Know About Roof Repair

A roof is your shield from the elements. If it’s not in tip-top shape, everything else inside is at risk.

Roof Repair

Examine the roof visually, including shingles and flashing around chimneys and dormers. Look for significant loss of granules and areas where shingles are missing. Also check the condition of gutters, eaves and roof edges. Contact Roof Repair NJ for professional help.

Typically, the first step in roof repair involves replacing shingles. A shingle is usually a single-colored piece of material that covers an area of the roof. It is held in place by a strip of asphalt sealant and nails. Shingles may be a little pricey, but they are a good investment because they protect the entire roof surface and prevent water leaks.

Shingles can be damaged by various weather conditions, such as extreme heat or cold and severe storms. A roof’s shingles can also be damaged if the nails aren’t properly placed, or if the adhesive strips are not fully adhered to the underlying roofing material.

If you notice that shingles are missing, it’s important to have them replaced promptly to avoid further damage and leaks. Overlapping shingles or resealing them is not a long-term solution and could lead to further problems in the future.

The first step in replacing a shingle is removing the nail that’s holding it in place. It is important to use a hammer and a flat pry bar, instead of a claw hammer, because the claw hammer can cause damage to the granules in the shingle. This is particularly important because the granules give the shingle its color, and are very important for keeping moisture out of the house.

To remove the nail, start by sliding the flat pry bar underneath the shingle just above the damaged shingle. This will break the sealant bond and reveal the nails beneath it. After the sealant bond is broken, you can easily remove the shingle and the nails.

Each shingle on a roof is actually secured with four nails. This is because the nails of the shingles in the course above it pass through the upper edge of the shingle below it. This allows the shingles to resist wind uplift. If you’re trying to remove a 3-tab shingle, it is easiest to pry up a few of the tabs in the course above to reveal the nails and pull them up.

You can then install the new shingle and nail it into place with the nails you removed from the previous shingle. After that, you can re-nail the shingles in the courses above it to secure them as well. If you have any leftover shingle cement, it is a good idea to apply some of it around the edges of the new shingle to secure it and prevent moisture from seeping underneath it.

Flashing

Flashing is a thin strip of metal that professional roofers install at critical areas, wherever the wall of a house meets a roof plane or there are other protrusions like chimneys, vents and skylights. This prevents water from seeping through these areas and into the house. It’s a very important component of any roof, and when it fails, you’re likely to experience severe water damage over time.

If you notice rust, leaks or other signs that your flashing is failing, you’ll want to call in a roofer right away for an emergency repair. In fact, flashing failure is one of the leading causes of home leaks and other roofing issues.

There are several different types of flashing, and a roofer will choose the best type for each situation. For example, base flashing is a sheet of metal that sits at the corner where a wall meets the roof and extends up to the shingles to prevent moisture from seeping in between. It’s also used at other corners of the house and to waterproof areas around windows and doors.

Another type of flashing is step flashing, which sits at an angle between the shingle courses and a wall or dormer. These pieces of metal are arranged in a series that looks very much like steps and overlap each other to prevent moisture from leaking through the gaps between them. A roofer will often use this type of flashing for a chimney, and it’s also common where dormers meet walls.

The last type of flashing is counter flashing, which sits at the top of a wall where it meets the roof and prevents water from running down the wall. This is especially important when a dormer or other structure is built over a flat roof.

There are two common materials for flashing: galvanized steel and aluminum. Galvanized steel is a less expensive option but can discolor over the years, while aluminum is a bit more costly but performs better and looks more attractive. A roofer will decide which material is best based on the budget and long-term performance they’re expecting from the flashing.

Gutters

Gutters are a crucial part of the roofing system, working in tandem with the roof to shed water. Gutters are essentially shallow troughs fixed beneath the edge of your roof, to catch rainwater and carry it down the sides of your house, to where it’s needed. Depending on the slope of your guttering, it can then direct the water into your garden, a waste system or even a rainwater collection tank – far away from the foundations of your home.

Guttering is actually a term for the whole of a roof’s guttering system, and can be made from a range of materials. Metal gutters are often used, but other options include copper, zinc, lead and vinyl. They can be either seamless or sectional, with a choice of trough shape and size, depending on the needs of your property.

A correctly functioning roof gutter system channels the water that falls off your house from the eaves to downspouts along the side of the building and away from the foundations, reducing erosion that can damage paint or stain on the house’s siding, as well as preventing leaks in crawl spaces and basements. But gutters can become clogged with debris such as leaves and twigs, making them less effective.

Regular gutter maintenance and repair is recommended, to ensure that they are always working properly. Professional roofing contractors can clean your gutters and downspouts, ensuring that they are clear of any dirt and debris. They can also tighten loose gutter parts, and check for rust or cracks.

While DIY cleaning can be done, if you’re unsure of your ability to do it safely and effectively, it’s best to leave it to a professional. They’ll be able to use a ladder to access hard-to-reach areas, and will know how to remove any twigs and other debris that could potentially cause harm. They’ll also be able to spot any issues that you may not have noticed, such as damaged or missing trough sections, and repair them before they worsen. This can save you time, money and stress in the long run.

Siding

Siding is an important part of your home’s exterior and it plays a crucial role in protecting the interior of your home from harsh weather elements. It helps to prevent moisture from entering your house and causing mold and mildew. Additionally, it’s a great way to add curb appeal to your home and enhance its beauty. However, like your roof, siding needs to be maintained and repaired in order to ensure it lasts.

One of the best ways to protect your home’s siding is by having it regularly cleaned. A good pressure washer can help you get rid of any dirt, debris or stains on your vinyl, wood or aluminum siding. However, you need to be careful not to use too much pressure because it can crack or damage your siding.

Another thing that can affect your siding is a leaking roof. If your roof is leaking, it can cause water to cascade down the side of your home and can start eroding or rotting the siding. This can also lead to moisture inside your home and cause mold, mildew and other issues. It’s important to have any leaking roof issues fixed as soon as possible to avoid costly repairs to your siding and other structural components of your home.

When it comes to roof and siding repair, a lot of times they can be done together, especially if you’re having the roof replaced. Replacing your roof and siding at the same time can help you save on labor costs and it can be completed more quickly as well.

If you’re thinking about having your roofing and siding repaired, contact a local company in Newnan to see what they can do for you! They offer a wide variety of roofing, siding and gutter services to keep your home looking great.

Whether you’re trying to boost your home’s curb appeal before selling it or you want to give it a facelift, having the roof and siding replaced can make all the difference. It’s an investment, but it can make your house feel brand-new and is a worthwhile upgrade.

Home Improvement

Why Replacement Windows Are a Smart Investment

Are your windows hard to open and close? Do you notice drafts or daylight around the window sills and trim?

Replacement Windows

New replacement windows can fix these problems and give your home a fresh new look. But what other benefits do they offer? Read on https://yourhomeexteriors.com/ to learn more about the top seven benefits of replacing your windows.

Windows are a key element in the look and feel of a home. And with new technology improving energy efficiency, homeowners are upgrading their windows and reaping the benefits.

Energy-efficient windows reduce drafts and keep the indoor temperature consistent throughout the house, which helps lower energy bills and provides a more comfortable living environment. They also protect against harmful UV rays, which can fade furniture and carpeting over time.

The energy-efficient options on the market today are available in a wide variety of materials, sizes and styles. And with many manufacturers using sustainable production methods and recycled material, homeowners can be confident they are helping to minimize their impact on the environment.

In addition to energy savings, homeowners may enjoy the benefit of reduced noise levels. Especially if they live near a busy road or construction area, energy-efficient replacement windows can cut down on traffic, construction and other outside noises that would otherwise carry through the home.

When shopping for replacement windows, homeowners should pay close attention to the NFRC label. The NFRC is the only national nonprofit that independently tests and rates windows, doors and skylights for performance and energy efficiency. CR has a handy guide that can help explain the terms on the window label, including the insulating value, air leakage rate and solar heat gain coefficient.

The right window frame material is also important. Vinyl and fiberglass are the most common choices for replacement windows, but there are also wooden and aluminum options available. Each has its own benefits and drawbacks in terms of cost, longevity and energy-efficiency.

When choosing the right window for your home, it’s important to choose a contractor with experience and a proven track record. A reputable contractor will be able to provide detailed measurements and ensure the new windows are properly installed for maximum effectiveness and beauty.

In addition, the contractor should be able to offer a warranty on their work and products. This can provide peace of mind and security, and it’s one more way that homeowners can be sure they are making the right investment in their homes.

Increased Resale Value

If you’re thinking about selling your home at some point in the future, premium replacement windows are a smart investment. They offer many benefits beyond providing a refreshed look to your home’s exterior and can help increase your resale value.

One of the biggest reasons to invest in replacement windows is that they’re more energy efficient than older windows. Old windows may be drafty and difficult to open or close, causing your energy bills to go up. New windows, on the other hand, are designed with more efficient materials and operate smoothly. This can save you money on your energy bills and can even qualify you for rebates and credits from your local utility provider.

Choosing the right window style and frame material is important, as well. Consider using a durable material like vinyl to ensure that your windows are low-maintenance and will last for years to come. Vinyl doesn’t require painting or staining, and it resists heat transfer and condensation, making it an excellent choice for replacement windows. Lastly, choose windows with simple operation and secure locks to maximize your home’s security.

New windows will give your home a more contemporary appearance, which is something that many buyers are looking for. This could make your house stand out from the competition and encourage potential buyers to schedule a showing.

Increasing your resale value is a big concern for most homeowners, and it’s one of the main reasons that people do home improvements. Thankfully, replacing your windows is a relatively inexpensive and easy way to increase the value of your home.

New windows will add a lot of appeal to your home’s exterior and will improve its curbside appeal. Additionally, they’ll make your home more energy efficient and will provide a better overall experience for anyone who lives in your home. As a result, they’re one of the best upgrades you can make to your home.

Increased Curb Appeal

A home’s windows can make a huge impact on the overall look of a house. If your old windows are drab or mismatched, they can leave a bad first impression on potential buyers. Not only does this affect your property value, but it can also turn off people who may be interested in your home.

New replacement windows can help boost your curb appeal by introducing a fresh look that will complement your other outdoor features, such as flowers and landscaping. Depending on the window style you choose, it may even offer unobstructed views of your yard or local scenery. Many homeowners find that this alone is enough to entice someone to take a closer look at their home, especially if it’s a window that faces the street.

Unlike older windows, replacement windows are designed to fit into pre-existing window holes, so there is less construction disruption and an easier installation process. This makes them ideal for those looking to upgrade an existing home without a large budget or the time commitment of a full remodel. New windows are available in a range of styles, from double-hung to casement, to suit any architectural design or personal preference. Some manufacturers also offer customized options, such as frame colors and grille patterns, to further enhance a window’s appearance and boost your home’s curb appeal.

Another benefit of new windows is their ability to enhance natural light and views, improving the lighting in rooms that face the street and boosting a home’s curb appeal. Many window designs, such as picture windows and bay windows, provide an unobstructed view of the neighborhood and beyond. These windows are particularly attractive in homes with a lot of greenery or scenic views, as they can bring the outdoors inside and allow residents to enjoy the beauty of their surroundings.

Homeowners who are upgrading their properties to prepare for sale can greatly improve their curb appeal with the addition of new replacement windows. Not only do these windows look great, but they are also more efficient, helping to reduce utility bills and making the home more comfortable.

Increased Home Value

Window replacement has become a popular home improvement project, offering an excellent return on investment. It is a way to improve your home’s energy efficiency, comfort, and aesthetics. It can also increase your home’s resale value and make it more marketable.

Savvy home sellers know that a well-maintained property often sells for a higher price, and replacing outdated windows is one of the most cost-effective ways to boost your home’s curb appeal. New windows look better and are easier to maintain than older, dingy-looking units. They may be less likely to leak or have other problems that would raise the home’s repair costs, which can deter potential buyers.

While the initial investment of replacement windows can be expensive, it is worth the expense if you are planning to stay in your home for years to come. Depending on your needs, you may be able to take out a personal loan or other form of installment credit. These loans offer quick access to the funds that you need, providing a simple way to pay for your new replacement windows.

You should consider upgrading your windows when they begin to show signs of wear and tear, such as warped frames or cracked glass. They could also start to leak air and water, increasing your utility bills and leading to rot and decay. Additionally, your home’s resale price can suffer if you have drafty windows and low curb appeal.

Many local energy providers offer rebates for ENERGY STAR® windows. These incentives can significantly reduce the cost of replacing your windows, which can boost your ROI even more.